VDI, or Virtual Desktop Infrastructure is one of those new IT buzzwords. VMWare does it, Citrix Xen Does it, a few others do it. RedHat does it (or, is in the process of doing it) as well.
A friend of mine has been looking into VDI for a client, and it got me curious. I knew SPICE was in the making, and i’d heard that it was pretty functional. So I started my search at SpiceSpace which is the spice project’s web site. I downloaded their user docs, and got a basic idea of how this works. Essentially it uses QEMU, the virtualization technology behind RedHat’s KVM, with some additional command line options to enable SPICE. The collowing command line will get you a vm running with spice enabled.
qemu -m 512 -hda /path/to/xp.img -boot c -qxl 1 -spice port=5930,disable-ticketing
Of course, /path/to/xp.img is replaced with a disk image which contains a bootable vm.
This would get you a vm listening on port 5930 for spice connections. Passwordless (thats the disable-ticketing option).
The problem here is that this means you need to curn out full-bore vm’s for every spice session. This isnt the cool VDI i was looking for. One of the touted options is that you could build a base image, and then make diff clones of it. After much digging, i was able to find out how the heck you make such a beast. So here’s a rundown of how i got things working.
The server is Rhel 5.5, running KVM. It’s actually a member of a cluster, i’m not using the clustering features in conjunction with spice. just using this one node to fire up a few VM’s for testing.It’s already fully configured, so I;m not going to document how i got it there, this assumes that you already have a hypervisor, running RHEL or one of its variants, and KVM.
First, i built a windows XP guest, just a base install.
[root@steel ~]# virt-install –accelerate –hvm –network bridge:kvmbr469 –name xpguest –ram 512 –file=/var/lib/libvirt/images/xpguest.img –vcpus=1 –nonsparse –check-cpu –file-size=10 –cdrom=/isos/windowsxp.iso
This build a VM in the usual kvm way. I connected to it with virt-viewer in order to complete the install.
[user@steel ~]$ sudo virt-viewer xpguest
Once it was installed, i used the information found here to build my linked clone images.
[root@steel images]# qemu-img create -b xpguest.img -f qcow2 xpguest-clone1.img
Formatting ‘xpguest-clone1.img’, fmt=qcow2, backing_file=xpguest.img, size=10485760 kB
[root@steel images]# ls -lh xpguest*
-rw-r–r– 1 root root 256K Apr 22 15:58 xpguest-clone1.img
-rw——- 1 root root 10G Apr 22 15:58 xpguest.img
[root@steel images]# qemu-img create -b xpguest.img -f qcow2 xpguest-clone2.img
Formatting ‘xpguest-clone2.img’, fmt=qcow2, backing_file=xpguest.img, size=10485760 kB
As you can see in the ls -lh between the first clone and the second, the coned images are pretty small. 256K.
Now, we needto add some command line options to the qemu-kvm command, I pulled out the wrapper I wrote when i wanted to hack BIOS serial numbers into kvm. I added the following options to the command line that I tack on to the end of the qemu-kvm line.
-qxl 1 -spice port=<port number>,password=testpass
I created two new wrappers, one called qemu-kvm-spice and one called qemu-kvm-spice1, each on a different port.
Then i created two vm’s by copying the xpgues.xml for my first vm, and modifying the VM;s name, disk image, and emulator. For the first copy, i acelled it xpguest1, pointed its disk image at xpgues-clone1.img, and its emulator at qemu-kvm-spice. For the second I named it xpguest2, pointed its disk at xpguest-clone2.img, and its emulator at qemu-kvm-spice1. The two wrapper scripts i wrote.
xpguest1:
<domain type=’kvm’>
<name>xpguest1</name>
<memory>524288</memory>
<currentMemory>524288</currentMemory>
<vcpu>1</vcpu>
<os>
<type arch=’x86_64′ machine=’rhel5.4.0′>hvm</type>
<boot dev=’hd’/>
</os>
<features>
<acpi/>
<apic/>
<pae/>
</features>
<clock offset=’utc’/>
<on_poweroff>destroy</on_poweroff>
<on_reboot>restart</on_reboot>
<on_crash>restart</on_crash>
<devices>
<emulator>/usr/libexec/qemu-kvm-spice</emulator>
<disk type=’file’ device=’disk’>
<driver name=’qemu’ cache=’none’/>
<source file=’/var/lib/libvirt/images/xpguest-clone1.img’/>
<target dev=’hda’ bus=’ide’/>
</disk>
<disk type=’file’ device=’cdrom’>
<target dev=’hdc’ bus=’ide’/>
<readonly/>
</disk>
<interface type=’bridge’>
<mac address=’54:52:00:01:6d:47’/>
<source bridge=’kvmbr469’/>
</interface>
<serial type=’pty’>
<target port=’0’/>
</serial>
<console type=’pty’>
<target port=’0’/>
</console>
<input type=’mouse’ bus=’ps2’/>
<graphics type=’vnc’ port=’-1′ autoport=’yes’ keymap=’en-us’/>
</devices>
</domain>
And xpguest2:
<domain type=’kvm’>
<name>xpguest2</name>
<memory>524288</memory>
<currentMemory>524288</currentMemory>
<vcpu>1</vcpu>
<os>
<type arch=’x86_64′ machine=’rhel5.4.0′>hvm</type>
<boot dev=’hd’/>
</os>
<features>
<acpi/>
<apic/>
<pae/>
</features>
<clock offset=’utc’/>
<on_poweroff>destroy</on_poweroff>
<on_reboot>restart</on_reboot>
<on_crash>restart</on_crash>
<devices>
<emulator>/usr/libexec/qemu-kvm-spice1</emulator>
<disk type=’file’ device=’disk’>
<driver name=’qemu’ cache=’none’/>
<source file=’/var/lib/libvirt/images/xpguest-clone2.img’/>
<target dev=’hda’ bus=’ide’/>
</disk>
<disk type=’file’ device=’cdrom’>
<target dev=’hdc’ bus=’ide’/>
<readonly/>
</disk>
<interface type=’bridge’>
<mac address=’54:52:00:01:6d:47’/>
<source bridge=’kvmbr469’/>
</interface>
<serial type=’pty’>
<target port=’0’/>
</serial>
<console type=’pty’>
<target port=’0’/>
</console>
<input type=’mouse’ bus=’ps2’/>
<graphics type=’vnc’ port=’-1′ autoport=’yes’ keymap=’en-us’/>
</devices>
</domain>
Then i virsh defined the two of them, and started them up.
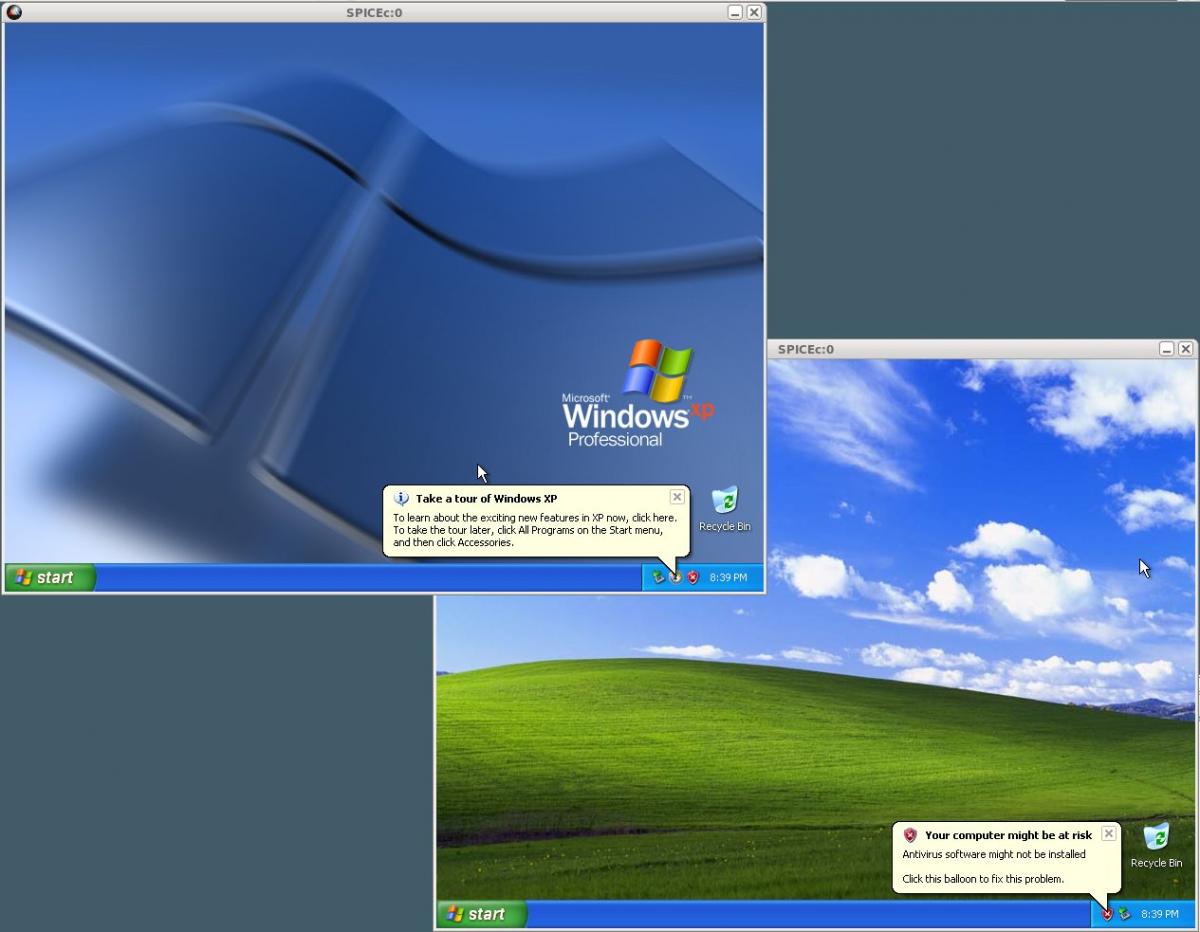
Once they were started, i gave the spice client a shot.
{user@client ~]$ spicec -h steel -p 8123 -w testpass&
[user@client ~]$ spicec -h steel -p 8124 -w testpass&
I ended up with two identical windows. For fun, i changed the background in one of them.
After starting up the VM;s and doing just this, the disk images have grown slightly, but still much better than having three 10gb images.
[root@steel images]# ls -lh xpguest*
-rw-r–r– 1 root root 27M Apr 22 16:22 xpguest-clone1.img
-rw-r–r– 1 root root 23M Apr 22 16:19 xpguest-clone2.img
-rw——- 1 root root 10G Apr 22 15:59 xpguest.img
Supposedly, this will share resources, such as usb and whatnot, but i’ve been unable to test that. It does not seem to do so out of the box, there must be some config option i need to enter. I’ll update this entry with that if/when i find it.