So, I have a long history of self-hosting. And let me tell you, self-hosting has gotten harder over the years. There was a point where I ran a linux server in my parents basement. It ran this web site (or a very much older version of it anyway) and a number of other services. In those days things were a little more wild west. You could pretty easily host services on a residential cable modem. For good reasons, those days are gone, ISP’s don’t want you running services on residential connections. You can argue all day if that’s a money thing or a security thing, but it is what it is. Most of us are stuck behind dynamic IP’s that could change at a moments notice, and NAT gateways. The end result is, gramma doesn’t have to worry about running a firewall on her Windows 10 pc. But if those of us who self-host want to make a service available outside, we have to jump through hoops, or pony up for commercial service. And by the way, some commercial services still don’t allow hosting, they’re just bound to a higher SLA. But lets get on to the real problem here.
I have a Digital Ocean droplet that I run things like this web site on. And I have a home lab that I run locally accessible things on. Things like my Plex media server, and my Home Assistant. All of them are designed with local access as the primary focus, but sometimes I want to access them remotely. Things like Home Assistant have ways to get that done (like their Nabucasa cloud service). The Spaghetti Detective will let me monitor my 3d printer remotely. Most services though don’t take this into consideration, Because they’re intended to be run on a public system if they are to be publicly accessible. This is why I have that droplet. Anything that I want to be accessible from the world, is running there, anything I want local, is on my home systems. The problem is, Digital ocean is certainly affordable, but I have a few things there that I would much rather have at home due to storage costs. Things like my Nextcloud instance. Now that I have a nice home NAS for things like that, I’m feeling more inclined to bring Nextcloud back in house than ever.
So, how do we do this? Well, its not all that complicated. We need a secure and reliable way to get from my DO droplet back to my home network. Then I can setup something like an nginx proxy config on my DO instance, and proxy the traffic back to my home system. But how do we get from DO to my private network? Simple. VPN. There are a lot of options out there for a VPN tunnel, for this project though, I’m going to give WireGuard a shot! Wire guard uses PKI to establish a connection, similar to SSH, and is surprisingly simple to setup. I am going to go into how to get wireguard configured, and not the specifics of getting nginx or whatever configured, once you have wireguard in place, you _should_ be able to figure out the rest, as its just TCP networking at that point.
Design
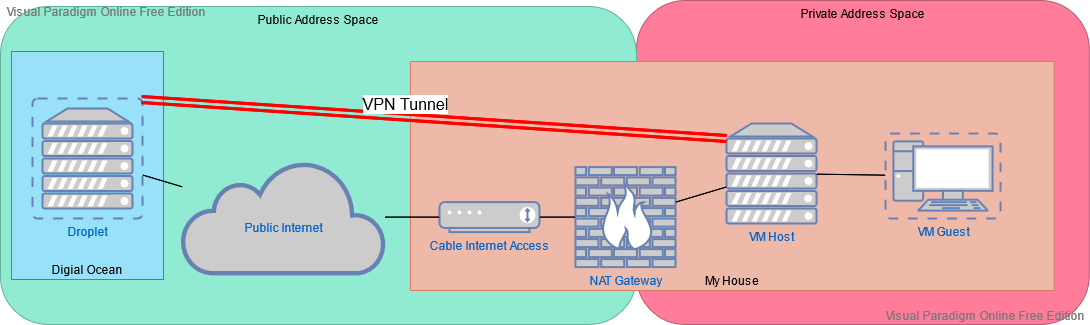
So here’s my plan.
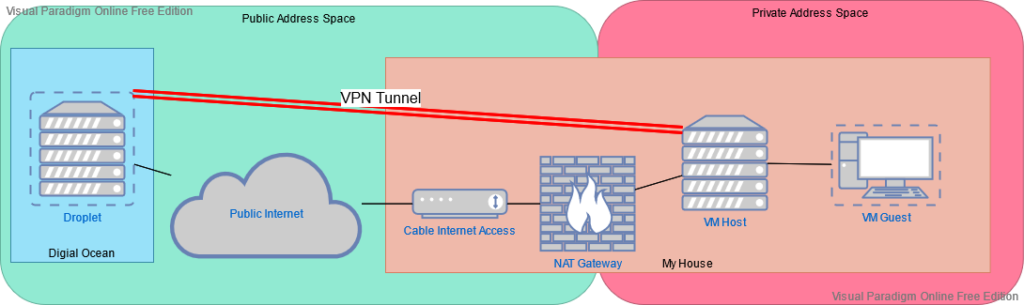
As you can see here, I have the nice static DO droplet, running services already, and then a VM host here at home, that runs a few VM’s. For now the goal is to get to one of those VM’s, a container host I run a number of services on. I want the connection to be expandable to other VM’s though, so I am terminating the VPN on the VM host, not on the container host. The VM host can then route to its guests. Of course, the VM host is on a private network behind NAT, behind a dynamic IP, so I do not want to depend on my DHCP lease not changing, the goal here is to make the DO droplet the only static IP defined anywhere.
Server (cloud host)
First we’ll configure the DO droplet, as the vpn server. WireGuard makes this really simple. You need to generate keys, then define an interface config, then bring up the interface, and make it start at boot.
Generate a private key, then derive a public key from the private. I placed these in /etc/wireguard, you should chown them root:root, and chmod them 600. And no, these are NOT the keys I went live with.
[root@do wireguard]# wg genkey > wgprivate
Warning: writing to world accessible file.
Consider setting the umask to 077 and trying again.
[root@do wireguard]# chmod 600 wgprivate

-- derive the pub key --

[root@do wireguard]# wg pubkey < wgprivate > wgpublic
[root@do wireguard]# chmod 600 wgpublic
[root@do wireguard]# ls -l
total 8
-rw-------. 1 root root 45 Aug 28 15:53 wgprivate
-rw-------. 1 root root 45 Aug 28 15:53 wgpublic
[root@do wireguard]# cat wgprivate
sIUWTpGeJqckATz97PdPeQ0Rs61kiuhugoVqbL9HT2U=
[root@do wireguard]# cat wgpublic
IiKGvXl+p+otY/3MmJ1fpDwhSMVZkxyhJLpozUNAcVQ=
Now you need an interface configuration file for the link. I called my interface wg0, which is pretty standard. I put the config in /etc/wireguard/wg0.conf
[root@do ~]# cat /etc/wireguard/wg0.conf
[Interface]
Address = 10.201.0.1/24
SaveConfig = true
ListenPort = 51820
PrivateKey = IiKGvXl+p+otY/3MmJ1fpDwhSMVZkxyhJLpozUNAcVQ=
Those configuration settings are pretty simple. The IP address that you made up for your wg0 interface, this should be something in non-routable private space. The port that wireguard should listen on, and the private key. This is the actual contents of the private key, not a path to it. I made that mistake at first. 😉 In my case, DO does not run a local firewall, it uses a DO configured firewall, like AWS security groups. I manually added this port to that definition, if you’re using firewalld, which I would be normally, you can add a PostUp and PostDown command to add your port to firewalld. That looks like this:
PostUp     = firewall-cmd --zone=public --add-port 51820/udp && firewall-cmd --zone=public --add-masquerade
PostDown   = firewall-cmd --zone=public --remove-port 51820/udp && firewall-cmd --zone=public --remove-masquerade
And that would go right after PrivateKey.
One more important option, is that SaveConfig. Once you have your interface up, and you connect a client, you will run a command to tell wg what ip’s to allow across the tunnel. SaveConfig will tell wireguard to save that additional config to the wg0.conf file when you bring the interface back down later. Thats important. 😉
Now we’re about ready to bring the interface up! There is a tool called wg-quick that will read that config file and make it so.
[root@do wireguard]# wg-quick up wg0
[#] ip link add wg0 type wireguard
[#] wg setconf wg0 /dev/fd/63
Now, let’s make it start up at boot.
[root@dp wireguard]# systemctl enable wg-quick@wg0Client (private VM host)
Now we need to connect a client. The basic setup is almost identical. Generate keys just like we did on the server, chown them properly, and then create a config file. The config file is a little different. It looks like this:
[root@vmhost wireguard]# cat /etc/wireguard/wg0.conf
[Interface]
Address = 10.201.0.2/24
PrivateKey = <the CLIENT's private key>

[Peer]
PublicKey = IiKGvXl+p+otY/3MmJ1fpDwhSMVZkxyhJLpozUNAcVQ=
Endpoint = do.public.hostname.com:51820
AllowedIPs = 10.201.0.1/32
PersistentKeepalive = 25
Now, here are the differences. We dont need some of the Interface options that we had on the host side, just address and private key. Peer though, is new. PublicKey is the public key of the peer, that is the DO instance in this case. Endpoint is the public IP or Hostname of the DO instance, and the port. AllowedIPs is a list of IP’s that should be accessible on the OTHER END of the tunnel from this host. In my case thats only the IP of the wg0 interface on the host, as I’m not intending to do any traffic in that direction. If you have several, they’re comma-separated. The PersistentKeepalive directive is to tell wireguard to send an empty packet over the tunnel every 25 seconds. This is because of the NAT in play here. Without this, your NAT entry will time out and the traffic will stop until the client sends more data to the server.
Now you bring up that interface the same way you did on the server.
[root@vmhost wireguard]# wg-quick up wg0
[#] ip link add wg0 type wireguard
[#] wg setconf wg0 /dev/fd/63
[#] ip -4 address add 10.201.0.2/24 dev wg0
[#] ip link set mtu 1420 up dev wg0
Again, also set it to start at boot.
[root@vmhost wireguard]# systemctl enable wg-quick@wg0Setting peers on the server
Now, we have to go back to the server, and tell it what IPs on this peer are OK to route. This is important in my case because this an access-list that tells wireguard what ip’s on my lab network it should route to. If i want to help contain possibly nasty traffic from the world at large, this is one way to do it.
[root@chaos1 wireguard]# wg set wg0 peer <client's public key> allowed-ips 10.201.0.2,192.168.86.76The 10 address there is the wg0 interface on my vmhost, and the 192 address is the IP of the vm i wish to be able to route too. You could add several local ips, or use a CIDR notation mask, like 192.168.86.0/24 for the whole network.
If you want to be sure this gets saved to your wg0.conf, you should take the wg0 interface down on the DO host, and bring it back up.
[root@do ~]# wg-quick down wg0
[#] wg showconf wg0
[#] ip link delete dev wg0
[root@do ~]# wg-quick up wg0
[#] ip link add wg0 type wireguard
[#] wg setconf wg0 /dev/fd/63
[#] ip -4 address add 10.201.0.1/24 dev wg0
[#] ip link set mtu 1420 up dev wg0
[#] ip -4 route add 192.168.86.76/32 dev wg0
[root@do ~]# cat /etc/wireguard/wg0.conf
[Interface]
Address = 10.201.0.1/24
SaveConfig = true
ListenPort = 51820
PrivateKey = sIUWTpGeJqckATz97PdPeQ0Rs61kiuhugoVqbL9HT2U=

[Peer]
PublicKey = <peer public key>
AllowedIPs = 10.201.0.2/32, 192.168.86.76/32
Endpoint = <peer's public IP>:44774
Conclusion
And that’s it! at this point you should be able to reach the IP’s on your private system from your cloud host!
[root@do ~]# for i in 10.201.0.2 192.168.86.76;do ping -c1 $i;done
PING 10.201.0.2 (10.201.0.2) 56(84) bytes of data.
64 bytes from 10.201.0.2: icmp_seq=1 ttl=64 time=38.9 ms

--- 10.201.0.2 ping statistics ---
1 packets transmitted, 1 received, 0% packet loss, time 0ms
rtt min/avg/max/mdev = 38.910/38.910/38.910/0.000 ms
PING 192.168.86.76 (192.168.86.76) 56(84) bytes of data.
64 bytes from 192.168.86.76: icmp_seq=1 ttl=63 time=47.3 ms

--- 192.168.86.76 ping statistics ---
1 packets transmitted, 1 received, 0% packet loss, time 0ms
rtt min/avg/max/mdev = 47.251/47.251/47.251/0.000 ms
From here, you can do things like use firewalld to port-forward to your local VM, or use an nginx reverse proxy, or really whatever you can do over a TCP connection. Enjoy!